In diesem Artikel wird erläutert, wie Sie Windows 11 als Gastbetriebssystem in einer virtuellen Maschine installieren, die auf VMware Workstation- oder VMware ESXi-Hypervisoren ausgeführt wird. Beim Versuch, Windows 11 auf einer virtuellen VMware-Maschine zu installieren, wird den meisten Benutzern eine Fehlermeldung angezeigt, die besagt, dass Windows 11 auf diesem Computer nicht ausgeführt werden kann. Versuchen wir zu erklären, warum diese Meldung erscheint und wie man sie umgehen kann.
Inhalt:
- Wie umgehe ich TPM und Secure Boot bei der Installation von Windows 11 auf einer VMware-VM?
- Installation von Windows 11 auf VMware Workstation
- Wie installiere ich Windows 11 auf VMware ESXi/vSphere?
Microsoft hat eine Reihe von Mindestsystemanforderungen für die Installation von Windows 11 veröffentlicht:
- 4 GB RAM
- 1-GHz-Dual-Core-CPU
- TPM 2.0-Chip (Trusted Platform Module).
Wenn Ihr Computer oder die virtuelle Maschine die Anforderungen nicht erfüllt, erscheint beim Versuch, Windows 11 von einem ISO-Image zu installieren, die folgende Fehlermeldung:
This PC can’t run Windows 11. This PC doesn’t meet the minimum system requirements to install this version of Windows. For more information, visit aka.ms/WindowsSysReqHow to Bypass TPM and Secure Boot when Installing Windows 11 to a VMware VM?
You can skip the system requirements check when installing Windows 11 on a virtual machine. You can bypass the minimum requirements checks for memory, compatible CPU, TPM chip, and UEFI+Secure Boot.
- To do it, run a normal Windows 11 installation on a VMware virtual machine. After the installation error appears (see the screenshot above), go one step back (click an arrow in Windows Setup window);
- Press
Shift + F10to open the command prompt;- Enter
regedit.exeto open the Registry Editor;- Go to the reg key HKEY_LOCAL_MACHINE\SYSTEM\Setup and create a new registry key named LabConfig;
- Create three DWORD (32-bit) parameters with values of 1 in the LanConfig reg key:
BypassTPMCheckBypassSecureBootCheckBypassRAMCheck
- Close the Registry Editor and the command prompt and get back to Windows 11 setup screen;
- Select Windows 11 edition and click Install;
- You should now be able to continue installing Windows 11 without checking the minimum system requirements and the TPM device.
Installing Windows 11 on VMware Workstation
To install Windows 11 in a native mode (meeting all system requirements) on VMware Workstation, create a virtual machine with UEFI support, Secure Boot and a virtual TPM chip.
Open virtual machine settings, go to the Advanced tab and make sure that UEFI firmware is used for the VM. Also check the Enable secure boot option.
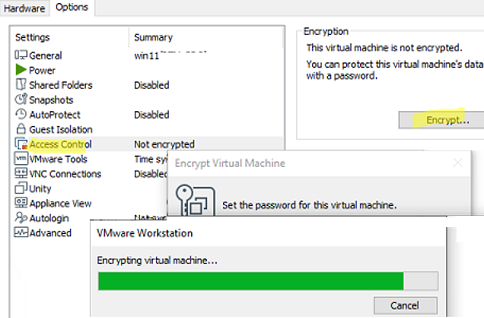
Then add a virtual TPM module (vTPM) to the VM. Before doing it, encrypt the VMware Workstation virtual machine.
Go to Access Control in the Options section and click Encrypt. Set the encryption password. The encryption takes some time.
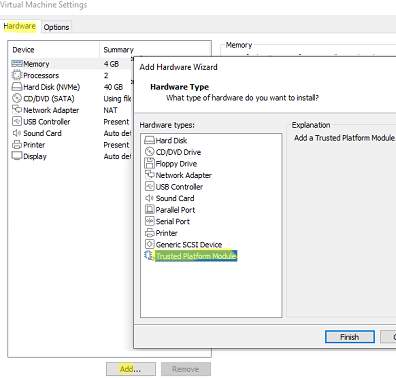
Then open the Hardware tab, click Add and add the Trusted Platform Module.
Then you can install Windows 11 on this virtual machine as usual.
How to Install Windows 11 on VMware ESXi/vSphere?
To install Windows 11 to a VMware ESXi virtual machine in vSphere, add the Virtual Trusted Platform Module to the VM. Before doing it, you will have to configure the Key Management Server (key provider) to manage encryption keys.
In vSphere 7.0 and newer, vCenter supports a built-in Key Provider, so you don’t need using an external KMS. To enable the built-in Key Provider in vCenter:
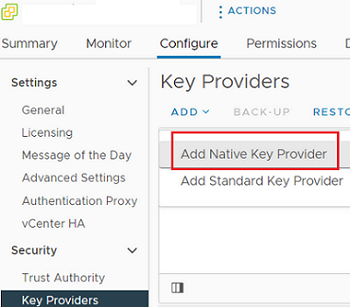
- Select your vCenter and open Configure -> Security -> Key Provider;
- Click Add -> Add Native Key Provider;

- Enter the provider name and uncheck the option Use key provider only with TPM protected ESXi hosts. It allows using vTPM for hosts without a physical TPM chip;
- Then back up the Key Provider. Click BACK-UP and download the .p12 file. Save it to a secure location.
To enable vTPM for a VMware ESXi virtual machine, it must meet the following requirements:
- vSphere 6.7 or newer (you will not be able to use free VMware Hypervisor)
- VM Hardware 14 (ESXi 6.7) or higher
- EFI and Secure Boot
- VM encryption
- Windows Virtualization Based Security option must be enabled in the VM settings
Make sure that all VM options are enabled and you can encrypt the disk of your VM.
To encrypt an existing VM, open the VM Options tab and enable disk encryption in the Encryption section.

Then you can add the TPM in the Virtual Hardware tab (Add New Device -> Trusted Platform Module) and run normal Windows 11 installation on the VM.


